

Creating your own welding cap allows you to fully customize your protective headgear. This DIY welding cap tutorial guides you through all the sewing steps with in-depth details.
Compiling Your Welding Cap Materials
Before starting your welding cap sewing project, you need to gather the necessary materials. Having all required fabrics, tools, and notions will make the process smooth and efficient.
Fabrics


About 1/2 yard of lightweight twill or duck canvas is optimal for both the outer cap and lining. These tightly woven fabrics are spark resistant and durable for welding applications. Ensure you have enough yardage to cut all the necessary cap pieces.
Interfacing

Interfacing gives shape and body to the cap brim so select a medium weight variety. You need roughly 1 foot of interfacing, either iron-on or sew-in styles work. Iron-on interfacing gets fused with steam from an iron while sew-in interfacing gets stitched into a seam.
Notions, Tools, and Pattern
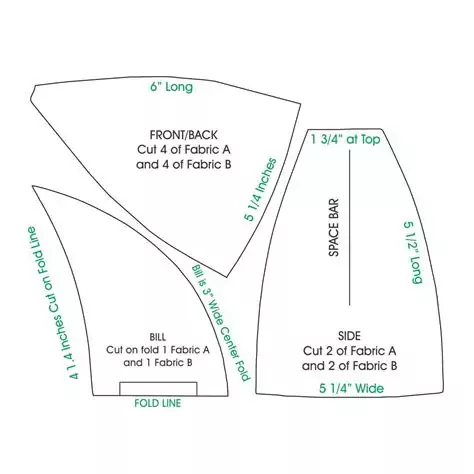
Additional supplies include matching thread, pins, fabric scissors or rotary cutter, iron and sewing machine. The key tool, the printable welding hat pattern, is below. This pattern provides size templates for accurate cutting and assembly.
With all your welding cap materials assembled, it’s time to start sewing!
Tracing and Cutting Out Pattern Pieces
Working from paper patterns requires some initial preparation:
- Print out the pattern for the welding cap template
- Assemble the tiled pages to recreate full cap templates
- Select your size and trace the corresponding pattern pieces onto fabric
- Be sure to trace 2 of each side/top/brim pieces plus 4 front and 4 back panels
- Cut around the traced lines through both outer and lining fabrics

Now the fun sewing steps begin!
Assembling the Exterior Cap
The exterior cap gets sewn first before adding the lining. Follow these directions closely:
Connecting the Side Pieces

- Take 2 outer side pieces and align RIGHT sides facing each other
- Stitch along the curved top seam; leave bottom open
- Press seam allowance towards one panel
- Topstitch for a clean finish along the seam
Joining Front and Back Sections

The process is the same for both front and back cap panels:
- Align 2 panels with RIGHT sides together, bottom curves matching
- Sew along one vertical edge; do not sew top curves
- Press the seam allowance open or to one side
- Finish by topstitching along the seam through both thicknesses
Attaching Side, Front, and Back Sections

After individually joining cap sections, combine them together:
- Match front edge of side panel to curved cap edge
- The indented corners are tricky but carefully pin well
- Slowly stitch all the way around both side curves continuously
- Press seam allowances open
- Add durability with topstitching around each seam
Once all outer pieces are joined, the full dome shape emerges!
Sewing the Matching Inner Lining

Construct the lining by repeating the previous sewing steps with the following exceptions:
- Use your cut lining fabric pieces instead of outer fabric
- There is no need to topstitch any of the lining seams
This shortcut method joins all lining cap sections together neatly inside out.
Creating and Adding the Brim

The brim provides shade from welding light glare. Here is how to interface it for structure before attaching:
- Stitch brim pieces together with interfacing inside sandwich
- Trim extra seam allowance close to stitching
- Turn brim right side out and use point turner for crisp corners
- Make rows of decorative stitches about 1/4″ apart
- Decorative stitches strengthen brim and make it cuter!
Attaching Brim and Headband

Aligning the cap and headband while attaching the brim takes precision:
- Center finished brim piece on inner headband/neck band
- Place outer headband piece precisely on top
- Sew continuously around the edges to encase brim
- Sew short ends of headband together with RIGHT sides facing
- Match up outer cap and inner lining cap domes
- Align headband/neckband to bottom cap edges
- Pin carefully, ensuring cap fronts and backs align
- Stitch smoothly all around bottom cap edge
Finishing Loose Ends

Adding the final touches completes your custom welding cap:
- Fold inner headband up and pin in place
- Sew close to folded edge to bind raw seam
- Remove pins, turn fully right side out
- Press flat, then topstitch close to neckband on the exterior
Check all stitching, trim loose threads, and test for comfort and fit. Now flaunt your unique welding cap!
Following these comprehensive step-by-step instructions will have you sewing your own personalized, protective welding headgear. Let me know if you need any clarification or troubleshooting along the way.

![Body Panel Adhesive VS Welding [Guide & Suggestions]](https://welding-world-awards.com/wp-content/webp-express/webp-images/uploads/2023/12/60db234c-1db6-460e-9ea5-eaeffc77f0ed.jpg.webp "Body Panel Adhesive VS Welding [Guide & Suggestions]")
")
")

![5 Best Welding Respirators – [Welder’s Mask] Expert Review 2024](https://welding-world-awards.com/wp-content/webp-express/webp-images/uploads/2023/11/top-5-welding-respirators.png.webp "5 Best Welding Respirators - [Welder's Mask] Expert Review 2024")
