

TIG (Tungsten Inert Gas) welding, also known as GTAW (Gas Tungsten Arc Welding), is an arc aluminum for beginners process that uses a non-consumable tungsten electrode to produce the weld using a tig torch and welding machine. The weld area is protected from contamination by an inert shielding gas, usually argon or helium. TIG welding allows for strong, high-quality 5356 welds on thin aluminum parts. It provides excellent tips and tricks control and can create clean welds on metals prone to oxidation like aluminum and magnesium.
TIG aluminum tig welding machine welding is a mainstay technique for fabricating everything from bicycle frames to aircraft components. Unlike soldering or brazing, TIG butt welds can match the strength of the original aluminum. The concentrated heat input from the TIG arc also minimizes weld bead distortion.
This article covers the basics of TIG welding tips and tricks aluminum. It will touch on topics ranging from joint preparation to welding equipment selection to welding techniques for aluminum plate, sheet and tubes. Novice welders of all ages and backgrounds looking to pick up the essential skills to start TIG welding thin aluminum parts will benefit most from the step-by-step guidance.
When TIG welding aluminum, it is important to use ac polarity and adjust the balance control appropriately for the material thickness you are welding. Carefully preparing the weld joint areas prior to welding using a wire brush or other method will also help achieve better results when welding aluminum. taking things slow and steady is crucial for beginners struggling with aluminum. Positioning the tig torch at the correct angle and distance from the aluminum would also impact the weld quality results when welding aluminum. Cleaning the surfaces properly prior to welding removes contaminants that can undermine weld joint integrity and cause defects. Following some basic tips for tig welding aluminum like using adequate filler rod and maintaining arc length will have novice welders laying down nice weld beads in no time. Simply take your time, prepare your welding torch setup accordingly, and practice on some scrap aluminum pieces until you get the hang of this exceptionally practical welding technique.
Basics of TIG Welding
The TIG welding process relies on an electrical arc forming between a non-consumable tungsten electrode and the metal workpiece on a welding table. The arc area must be shielded from the air by an inert gas flow during butt joint welding using appropriate weld material.
In most applications, argon gas provides the ideal shielding for inch aluminum ac welding. The inert gas prevents aluminum from rapidly oxidizing when molten. The stable arc also allows the torch to direct heat precisely to control the weld pool. The result is the clean, oxide-free bead profile welds that TIG is known for.
Other major advantages of TIG welding aluminum include:
- Excellent strength and corrosion resistance allowing thin helpful when material use
- Low heat input and learning to distortion Capability to weld a variety of metals and thicknesses
- No need for flux or aluminum filler rod in simple applications
To TIG weld aluminum at home, the essential equipment includes a TIG welder, compressed gas source, torch setup with similar settings, filler rods, protective gear, and metal cleaning supplies. Following best practice for preparing and handling the molten aluminum is crucial. An ac arc provides superior cleaning action to remove contaminants. Adjusting parameters like balance control and using 1 amp helps prevent burning through thin sections. While tig welding requires some dc tig experience, beginners can start welding various grades of aluminum with lot of practice on tig welding techniques. Progressively start welding samples of increasing complexity while sharpening your ceriated tungsten approach. Following these basic tips will have you laying down clean welds in no time.
Understanding Aluminum for TIG Welding
Aluminum has several intrinsic properties that dictate the techniques needed to successfully TIG weld:
- High thermal conductivity – requires concentrated heat input
- Tenacious surface oxide layer – necessitates extensive cleaning
- High coefficient of thermal expansion – can lead to cracking with rapid heating/cooling
Due to these factors, beginners often face issues like failing to penetrate the metal, porous contaminant-laden welds, and weld cracks.
Proper joint design, surface prep, filler selection, and managing heat input/cooling rate are key to address these aluminum TIG welding hurdles. The metal surfaces should be thoroughly cleaned of any oil, paint, oxide layer, or dirt through solvent washing and stainless steel brushing/abrading. These steps produce consistent welds.
Techniques
Once acquainted with the quirks of aluminum, developing proper technique is vital to create durable, attractive TIG welds. The essential skills involve coordinating your hands, eyes, and brain to simultaneously control the torch, melting metal, filler addition, and solidification.
Torch angle, tip distance, travel speed, and arc length all impact puddle fluidity and shape. Aim for a focused arc barely contacting the leading edge of the pool. Holding the torch perpendicular to the joint, slowly walk the cup along as you deposit filler into the trailing end of the molten area.
Dialing in the amperage and arc voltage establishes the appropriate welding current level. Too little amperage fails to achieve penetration across a joint. Excessive heat complicates controlling the puddle and risks burn through. For 3 mm 5052 aluminum plate, ideal starting parameters are 120 amps at 11 volts.
The machine settings also balance the arc force and hot start/crater fill behaviors when sticking the arc and finishing welds. Advanced square wave TIG units even allow adjusting frequency for the best wetting and cleaning action from the arc oscillations.
Other suggestions to hone aluminum TIG welding skills include:
- Maintaining 1mm arc length as distance varies from cup contact
- Using smallest tungsten and cup size to focus arc density
- Adding filler with leading end in cooler area and not touching tungsten
- Making stringer beads on a practice plate to steadily lay wires of filler metal
- Cleaning thoroughly between weld passes
- Preheating thin aluminum over 3mm thickness to 150°F
With patience and persistence, TIG welding aluminum presents a very feasible starting point to pick up this indispensable fabrication skill.
Filler Metals
The filler metal makes up a large portion of many TIG welds and carries the load in joints through its solidified deposit rather than by melting the base materials together. Matching the composition and properties between the filler and aluminum alloys being joined dramatically impacts the quality and longevity of TIG welds on aluminum.
Common aluminum filler metal varieties include:
- Pure aluminum (1100) rod
- Aluminum/silicon (4043) wire
- Aluminum/magnesium (5056) filler
- Other specialized compositions (2319, 5183, 55356)
Each TIG filler metal exhibits characteristics from its alloying elements influencing flowability, cracking tendency, strength, corrosion resistance, color match, and more. The pure 1100 aluminum rod offers the simplest filler choice with good appearance matching on 1xxx series alloys at the cost of lower strength. 4043 wire provides superb fluidity with some silicon deoxidizing action for better aluminum wetting. Matching the filler to the base alloy’s major alloying additions also minimizes cracking and helps preserve similar mechanical properties.
Selecting which filler to employ relies on considering:
- Strength, ductility, and composition goals
- Alloy type and temper of aluminum being welded
- Section thickness and joint restraint forces
- Welding position challenges requiring fluidity
- Availability and cost limitations
An excellent starting approach is to purchase a variety of the common aluminum TIG filler sizes and compositions to find what works best for your welding projects on scrap material.
Setup and Welding Process
Prior to striking an arc, properly configuring your TIG equipment boosts productivity and reduces frustration when learning. Most modern inverter welders contain preset hot start, arc force, and pulse parameters suitable for aluminum in the 130-150 amp direct current electrode positive (DCEP) range. Choosing 100% argon as the shielding gas flowing at around 15 cubic feet per hour (CFH) (or 10-25 liters per minute [L/min]) also protects the aluminum welding puddle from atmospheric contamination.
The argon shielding gas displaces air and prevents nitrides from forming in the weld metal. Hot start helps initiate arc start to avoid sticking. Arc force smooths out the arc when welding aluminum. Pulse parameters like frequency and % on-time also help make a wide puddle to fill grooves in joints in aluminum fabrications. Configuring these synergistic welder settings takes trial-and-error, but the manufacturers try optimizing them. Generally starting around 120-150 amps using a #5 or 3/32″ lanthanated tungsten electrode ground to a point works well to weld 1/8″ aluminum sheet joints. The right triangular grind angle balances performance and electrode wear over time. Wiping oxides off surfaces using a stainless brush and acetone also aids in welding aluminum before starting.
With a sharp, lubricated tungsten secured in the torch, securing your workpiece, and welding gear on, follow these steps to execute a TIG weld:
1: Clean
Scrubbing your aluminum piece means removing the oxide layer on the metal.
This step is the most crucial part of the entire process.
The cleaning is needed cuz of the difference in the melting temps of the oxide layer and raw aluminum:
- Aluminum melts around 1,200 degrees Fahrenheit,
- While its oxide layer doesn’t melt until over 3,200 degrees Fahrenheit.
Methods for Cleaning Aluminum Surfaces for Welding
| Contaminant | Cleaning Method | Description | For Welding Surfaces | For Entire Piece |
|---|---|---|---|---|
| Oil and Grease | Solvent Wipe | Wipe with acetone, alcohol, or other hydrocarbon solvents using lint-free cloth | Yes | Yes |
| Alkaline Wipe | Wipe with solutions containing sodium/potassium hydroxide at 5-10% concentration | Yes | Yes | |
| Dip Degreasing | Dip just joint edges into agitated alkaline or solvent tank for 1-3 minutes | Yes | No | |
| Emulsion Cleaning | Spray with alkaline emulsifying cleaners and pressure rinse | No | Yes | |
| Vapor Degreasing | Condensation of hot solvent vapors like trichloroethylene or perchloroethylene | No | Yes | |
| Ultrasonic Agitation | Combine alkaline solution bath with ultrasonic waves to lift contaminants | No | Yes | |
| Dust and Particulates | Vacuuming | Use industrial vacuum attachment to remove loose debris | Yes | Yes |
| Blowing | Use filtered, moisture-free compressed air to blow away particles | Yes | Yes | |
| Rinsing | Rinse with water and allow to fully dry | Yes | Yes | |
| Surface Oxides | Acid Etch | Dip or wipe joint with 10-30% nitric acid, sulfuric acid, or phosphoric acid solution | Yes | No |
| Abrasive Blast | Blast surface with aluminum oxide grit at 60-100 psi to remove oxides | Yes | Yes | |
| Stainless Wire Brush | Remove loose oxides using manual or powered wire brush | Yes | Yes | |
| File/Sand | File or sand joint and adjacent area to expose bare metal | Yes | No |
If left alone, when TIG welding at high temps, the oxide layer would just chill there like a skin, while the aluminum underneath melts away.
There are three routes you can take to clean the aluminum’s oxide:
- Use the self-cleaning zing from AC settings (tweaking the AC balance)
- Use chemicals like acetone or other degreasing solvents
- Use mechanical tools, like a wire wheel brush
Remember – fiddling with the AC balance alone cannot replace properly prepping aluminum.
The reason is gunk like oils, hydrocarbons, or old tapes need chemicals or brushes to strip away completely.
2: Set up your Welder for Aluminum TIG
You gotta get to know the controls on your welding rig.
Some key settings to peep include:
- Choosing your welding amps
- Picking the polarity (use DCEP for balling the tungsten, then flip to AC for welding aluminum)
- Customizing the cleaning percentage
- Tuning the AC frequency
3: Strike the arc and scrub away
After balling the tungsten tip, flip the polarity switch to AC and you’re primed to weld.
Grip the torch tightly with around a 15 degree angle and keep the tungsten near the aluminum (about 1 tungsten diameter away).
When ready, strike up that arc.
The cleaning buzz will start immediately – you’ll see the metal cook off and get that frosty sheen.
Remember to wear some TIG gloves, cuz this process can get pretty hot.
4: Form the weld pool and add filler
After 1-2 seconds, a shiny wet puddle appears as the oxide dissolves.
When you see this, start moving the torch real steady-like.
Glide the torch evenly along around 1/8 inch gaps, and tap the filler rod into the tail of the puddle.
To dab the filler, grip the rod between two fingers and pinch with the thumb.
Just dunk the filler at the puddle base – dipping in the center contaminates the tungsten.
Keep the arc tight by holding the torch close so the weld sits snug under argon blanket.
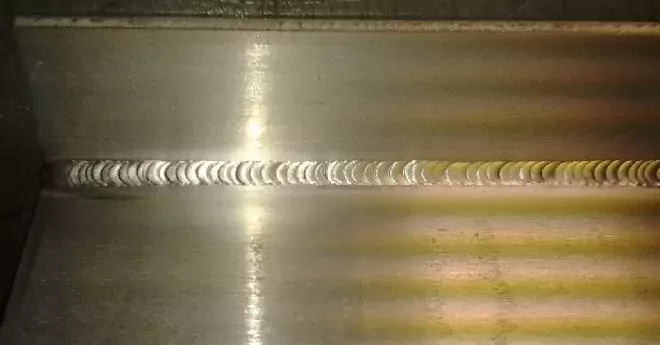
If done right, you’ll see smooth consistent ripples in the weld.
Control the temp with the pedal to dial-in those amps perfectly every time.
Pro tip: raise the torch slightly when adding filler, since the puddle height changes.
Otherwise, the puddle will glom onto the tungsten.
Keep the torch and filler at 90 degrees too for easy slides.
Basically – slide one hand smoothly while the other hand dabs in that filler metal.
5: Taper off and wrap it up
Reaching the end, don’t just stop welding.
Add a tad more filler to the last bit, while swirling the torch around as you decrease heat.
Otherwise, you can blow holes straight through the weld itself!
My experience TIG Welding Aluminum with DC
I’ve gotten into debates about TIG welding Aluminum on DC. Many say you Can’t do it! In my 15 years welding, I’ve learned there’s no such thing as Can’t – you just don’t know how. So I want to share a recipe for how to weld aluminum on DC.
Machine Settings
- Set for welding Steel at 190-210 amps
- Use a foot pedal
- Standard or gas lens setup
Materials
- 2% tungsten rod
- 3/32-1/8″ rod sharpened
- 4043 rod 3/32″
Gases
- 25-30 psi Helium
- 5 psi Argon
Pros
- Don’t need AC
- No Preheat for thick parts
- Small root pass preheats for cap
- Burns hotter for less warpage
Cons
- Dirty looking weld
- Wire balls up if placement bad
- Helium isn’t cheap
TIG welding aluminum on DC is an unconventional yet viable technique for certain applications. With the proper machine settings, materials preparation, gases, and technique, quality welds can be achieved on aluminum using DC instead of the more common AC method. While DC leaves a cosmetically dirtier weld and has a narrower margin of error, it offers benefits like no preheating and less part warpage. For the right use cases where appearance is not critical, DC aluminum welding can be an effective option for skilled welders.
Troubleshooting
Knowing the causes and corrections allows diagnosing and resolving problems:
| Issue | Cause | Solution |
| Lack of fusion | Inadequate cleaning or low heat input | Increase amperage; thoroughly remove surface oxides |
| Porosity | Contamination from oils, coatings, or filler additions | Use solvents and abrasives; protect weld puddle from air exposure |
| Cracking | Excessive heat input; alloy susceptibility; joint rigidity | Preheat; add filler smoothly; use pulsed arc welding technique |
| Burn-through | Too much heat concentrated in one area | Maintain steady travel speed; reduce amperage |
| Distortion | Rapid heating and cooling of the weld area | Use preheat; plan joint design to minimize stresses; use clamps or jigs |
Safety Precautions
Proper safety steps reduce the risk of burns, electric shock, lung damage, fires, and injuries.
Essential protective equipment includes:
- Welding helmet with proper lens shading
- Heat-resistant gloves with sleeves
- Leather apron and fire-resistant clothing
- Safety boots
- Respirator or fume extractor
Additionally, one must:
- Keep the work area clean and free of combustibles
- Ensure adequate ventilation when welding
- Secure gases and operate torches cautiously
- Never touch live electrical parts
- Allow sufficient cooling time before handling welds
Staying alert and adhering to safety guidelines keeps welders healthy while preventing workplace accidents. Considering risks allows enjoying TIG welding aluminum productively and responsibly.
Conclusion
Mastering aluminum TIG welding relies on understanding the unique properties of this light metal. Success comes from laying the groundwork – cleaning parts, tuning your machine, striking and establishing a molten weld pool, coordinating fill metal additions, and controlling heat input.
While the process presents some challenges at first, the exceptional strength, corrosion resistance, appearance, and reliance on skill rather than strength or vision make aluminum GTAW very rewarding. The precision, control, and artistry continue captivating fabricators.
For novice welders, be patient with yourself in developing good technique. Stick to the fundamentals, watch welding instructors closely, and repeat proper torch movements through hands-on practice. As thermal efficiencies and arc precision improve over time, so will the quality and consistency of aluminum TIG welds. Persistence and dedication to the craft breeds competence.
With a fundamental grasp of how to TIG weld aluminum, new welders can feel empowered tackling projects on this versatile modern metal using a quintessential welding process.
")
")
")

")
")