
Want to know the tips for accurate, smooth and perfect stainless steel tig welding? Stainless steel welding always requires specific tips and techniques to weld it without any colour change and bubble formation.
Both beginners and professionals must need to follow the tips for excellent welding work.
Improvements to Your Stainless Steel TIG Welding
In this article, here we bring the 6 best tips for safe and accurate stainless steel tig welding. By following all these techniques, you will get an unexpected brilliant result of welding.

There is no shortcut to these tips for stainless steel welding.
In every welding work, the cleanliness of metal is the welder’s priority to make an accurate and perfect thing. But in tig welding, it is one of the most crucial things to clean all the metal surfaces and joints properly before starting welding. You can not follow any shortcut here if you want perfect results.
If you do not clean the metal surface, bubbles will form during welding. These bubbles not only decrease your work quality but also weaken your surface. You can clean your metal surface as much as you can want.
To clean the stainless steel surface, a clean rag is very helpful. But you have to spend more time and effort using the rag.
The other best way to clean the surface is through the use of acetone and other thinkers. These thinners will clean the stainless steel surface in just seconds without extra effort while also evaporating very fast.
2. Tungsten rod
In the market, there are different types of tungsten rods available. Some are pure tungsten, while others may contain some additives with them. Both types of rods do not make much difference in your welding work and quality.
The main difference between them is that some have excellent long-lasting ability in arcing while some have quick and low arcing ability.
All these things matter, but the main thing to consider during accurate welding is tungsten rod diameter.
If you use a large diameter tungsten rod to weld a light metal sheet with low amps, your weld will not be accurate, flat, and consistent.
The key to precise welding is to select the rod diameter with your sheet weight. If you weld a heavy stainless steel sheet with a large diameter rod, you will definitely get your expected result in the end.
3. Gas coverage
The colour of stainless steel can be changed during welding if you use a bad technique.
If the air gets involved in welding, this thing will change your stainless steel colours during its welding. Not only the colour is changed, but the surface also becomes rough and includes bubbles in it.
This is the only solution that will increase your gas coverage under your economical budget to prevent this problem.
The more you will use the gas to weld steel, the more you will get a perfect result without colour change.
4. The clean, sharp tip
Dirt is one of the biggest reasons that destroy all the welding processes. If your tungsten tip is dirty, you will never get the perfect result. Most of the time, welders clean the tips, which helps them a lot in welding.
But if you do not clean the tip and start welding, then you will get a dirty tip weld at the end. When the filler rod joins the hot tungsten tips, they melt and create a blob on the tip.
With a dirty tip, you will never make a perfect arc design. All of your efforts will be ruined in the end.
A ground tip can only make a perfect arc shape with excellent precision. To make a superior quality clean arc, only one thing is needed; one is a fine point, and the second one is a smooth finish.
5. Speed of welding
The stainless steel surface is not as sturdy as other heavy metals. There is not too much heat needed for its welding. If you use an extra amount of heat to weld it, you will not get the desired result in the end.
On the other side, it is also not suitable to slow down the heat level. This thing will slow down your work and will consume more heat to finish the project.
The only key to welding perfectly is to use enough amperage to give you good results without affecting the accuracy.
The usage of amperage also varies from person to person due to their capability and welding style. The best practice is running the welder with medium heat and doing the welding fast to comply with the heat.
6. Project cooling
Stainless steel is sensitive to heat, and it can quickly wrap into any shape by an excess of heat. During its welding, you will also see different colours like red, blue, and black.
All of these colours are the result of excessive heat. Welding is not possible without heat, and you can not melt any metal without heat. But the welding of stainless steel needs more specific heat to melt it and weld it for different things.
One of the best things we like to tell you is that you can make an eye-catching weld joint without any colour changing effect.
This thing is only possible with good penetration. The only thing to remove the blue, red, and worse black colour from your welding is only done by using the right amount of heat.
The control of heat is very important to get colour free welds. During continuous welding, the amount of heat increases continuously, and ultimately it affects the colours of welds. To avoid this problem:
- Take breaks during welding.
- When you start the project, keep an eye on its colours.
- When you notice the colour of the welds is changing, stop welding, and let the section cool down. This process will keep your welding colour free and prevent the irregularity of shapes due to overheating.
You must check out the Best Tig Welders for the Money to buy.
How does the cyclogram affect the setup process of TIG machines?
Welding is a technological process in which a large number of parameters and factors must be taken into account. The greatest control over welding characteristics is required for TIG arc welding with a non-consumable electrode in inert gas shielding. Therefore, to simplify the control of a number of parameters in welding inverters, a cyclogram is used.
With the help of cyclogram the welder sets the necessary welding parameters so that the process does not cause difficulties, as well as to prevent various defects. Let’s consider the cyclogram of the welding machine.
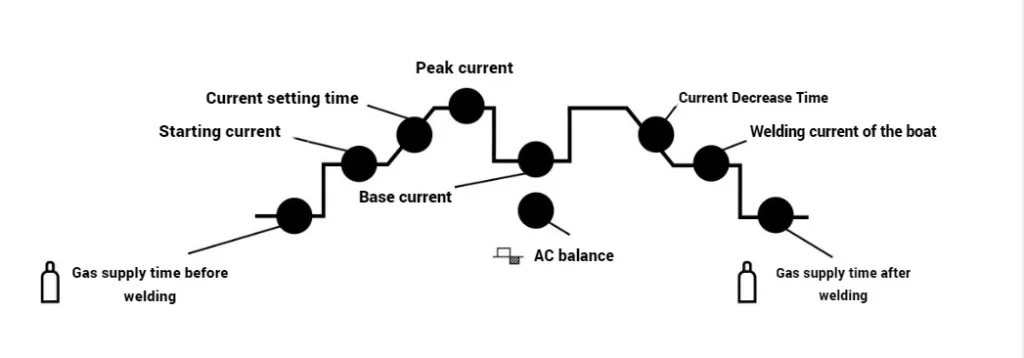
Each parameter of the cyclogram is important, so in order to obtain high-quality welded joints, it is necessary to understand why it is needed and how to set it up. Let’s analyze each of them in detail.
Time of gas supply before welding
This is a parameter that increases the delay time of the high-frequency oscillator, while the gas valve in the machine is in the open position, thereby supplying shielding gas to the torch. Typically has an adjustment range of 0.1 to 10-15 seconds. Adjusting this parameter allows you to expel from all channels of argon-arc torch excess oxygen so that it did not get into the welding zone and did not fill the weld seam with vapors, because inert gases are heavier than air and displace oxygen from the welding zone.
Tip. The recommended gas supply time is 1.0 to 2.0 seconds. This is enough to expel air from all channels and not to waste shielding gas.
Starting current
A parameter that allows you to set the welding current at the beginning of welding. Warms the edges of the metal to be welded evenly to produce a weld pool and subsequent insertion of filler rod. Typically has a range of 5-15 amps up to the maximum welding current of the machine.
Current rise time
A parameter that can be used to control the time it takes for the welding current to change from the starting current to the main (peak) current. This parameter is of particular importance when welding thick metal, when the edges are already heated, but the welding current is not strong enough to produce a weld pool. The adjustment range is from 0.1 seconds to 10-15 seconds.
Peak current
The peak current for non-pulsed arc welding is the main welding parameter that forms the weld pool and the weld seam. In pulsed arc welding, it is the upper limit of the welding current that also forms the weld seam. Usually has a range from 5-15 amperes to the maximum value of the welding current of the machine.
Tip. Start current is better to set more peak (main) current at 10-20 Ampere to quickly form a weld pool without further overheating of the base metal. It is better to set the current drop time from 1.5 to 2.0 seconds, so as not to heat the metal for a long time and not to get burned.
Base current
An indicator that, in combination with the peak current, gives a pulsed arc with a certain frequency that can be adjusted. The base current sets the lower limit of the pulse. It is used when welding thin sheet metal to prevent overheating, burnout of alloying elements, scorching and warping. The base current helps keep the weld pool from failing and from scorching. The standard adjustment range is from 5-15 Amps to the maximum welding current of the machine.This parameter will only be active in AC Pulse and DC Pulse mode, i.e. pulse arc welding, in other modes this parameter will not work.
Current Decrease TimeWith the current reduction time you can control the time of change from the main (peak) welding current to the crater weld current. It has an adjustment range of 0.1 to 10-15 seconds. During this time, the current will decrease smoothly to prevent a crater from forming at the end of the weld.
Crater Welding CurrentA parameter that allows you to set the current to complete the welding process. The range is from 5-15 Amps to the maximum welding current of the machine. Allows welding to be completed without cratering.In the 2T torch mode, the current drops and crater welding starts when the button is released, in the 4T mode the button must be pressed until the arc is extinguished.
Gas supply time after welding
Parameter at which the high-frequency oscillator is switched off and the gas valve in the machine is in the open position, thus supplying shielding gas to the torch. The adjustment range is from 0.1 to 10-15 seconds. Adjusting this parameter allows cooling of the torch and the workpiece to be welded.
Additional welding parameters
We recommend to pay attention to welding parameters that are applicable only in certain modes:
1. AC polarity balance in AC and AC Pulse mode
The polarity of the welding current has a significant effect on the arc welding process. When reverse polarity is used, the TIG welding process is characterized by the following features:
- Reduced heat input to the workpiece and increased heat input to the electrode (therefore, when welding on reverse polarity, the electrode must be of larger diameter at the same current. Otherwise, it will overheat and quickly deteriorate.
- The zone of melting of the base metal is wide, but shallow.
- There is an effect of cathodic cleaning of the base metal surface, when under the action of a stream of positive ions there is a destruction of oxide and nitride films (cathodic atomization), which improves edge fusion and weld formation.
When welding in direct polarity, the following is observed:
- Increased heat input into the workpiece and reduced into the electrode.
- The melt zone of the base metal is narrow but deep.
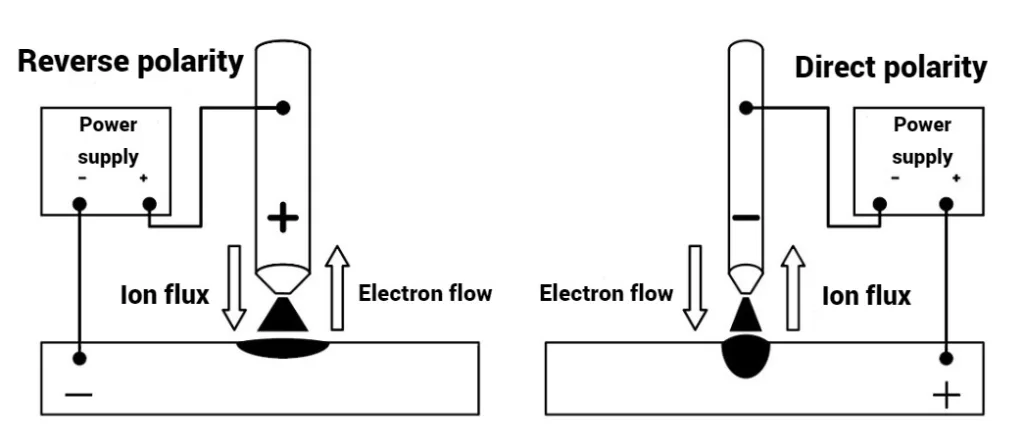
Tip. When welding aluminum on alternating current, it is necessary to form a ball at the tip of the tungsten electrode, no more than ½ the diameter of the electrode.
To form a ball on the end of the electrode it is necessary to:
- Set the adjustment so that the AC polarity balance is 50/50, the index is (65 15)/2=40. 40% – the balance of negative half-wave and positive half-wave is the same.
- Set the polarity balance to the 45-50 position. On this mode the ball is formed in the given values of diameter. If you set the polarity balance higher, the positive half-wave will increase, more electrons will flow, and the bead will start to form on the tungsten.
- After the bead is formed, we recommend returning the polarity balance to its original position.
2. AC Frequency (AC and AC Pulse mode)
This parameter affects the heat input to the metal, the stability of the arc burn, the depth of penetration and the width of the cleaning zone. The higher the AC frequency, the more stable the arc burn, the narrower the weld, the less heat input into the workpiece. It is used when welding thin sheet metal, where it is necessary to stabilize the arc and reduce heat buildup. The lower the AC frequency, the wider the weld, the larger the cleaning zone and the larger the weld penetration. It is used when welding thick metal.
3. Pulse Frequency (DC Pulse and AC Pulse mode)
This parameter affects the heat input to the metal, the stability of the arc and the depth of penetration. The higher the current pulse frequency, the more often the peak current will fall to the base current and vice versa – the base current will rise to the peak current. This ensures stable arc burning, narrow welding seam and lower heat input into the workpiece.
It is used when welding thin sheet metal, where it is necessary to stabilize the arc and reduce heat buildup. The lower the AC frequency, the less often the peak current will fall to the base current and vice versa – the base current will rise to the peak current, hence, wider weld seam, larger cleaning zone and larger weld penetration. It is used when welding thick metal.
4. RQ or pulse fill in DC Pulse and AC Pulse mode
This parameter is similar in physical meaning to the AC polarity balance. However, the pulse width does not regulate the positive or negative half-wave, but rather regulates the duration of peak and base current per pulse duration cycle.
Example: If the pulse frequency is 50 Hz, which corresponds to 20 ms, and the base and peak currents are 50 and 100 Amps respectively, if the pulse width is 50%, 10 ms the current will be 100 Amps and the remaining 10 ms will be 50 Amps, if the pulse width is 75%, 15 ms the current will be 100 Amps and 5 ms the current will be 50 Amps.
Based on the above, the higher the pulse width, the longer the duration of peak current and higher heat input into the metal, wider the weld pool. The lower the pulse width, the lower the heat input, the more stable the arc, the narrowerthe weld pool.
Remember that careful attention to the settings of welding parameters will help to avoid defects and difficulties in argon-arc welding TIG. As a recommendation, below is a table emphasizing the important points of setting the welding parameters. The table is for reference only and does not serve as a guide.
| Metal thickness Welding position | Thin metal (up to 3 mm) | Thick metal (from 3 mm) |
| Lower | DCPulse frequency from 100 Hz and above.Pulse frequency from 10 to 50%.Starting current above peak current by 5-10A.Base current from 25 to 50% of peak current.Peak current up to 70-85A. ACanalogous to DC and additionally:AC frequency from 100Hz and above.AC polarity balance above half. | DCStarting current above peak current by 10-25A.Peak current from 70-85A. ACAnalogous to DC and additionally:AC frequency below 100Hz.AC polarity balance below half. |
| Angular | DCPulse frequency from 150Hz and above.Pulse RMS from 30 to 50%.Start current above peak current by 5-10A, base current by 25-50% of peak current.Peak current up to 75-90A. ACAnalogous to DC and additionally:AC frequency from 150Hz and above.AC polarity balance above half. | DCStarting current above peak current by 20-30A.Peak current from 75-95A. ACAnalogous to DC and additionally:AC frequency below 100Hz.AC polarity balance below half or half. |
| Vertical (bottom-to-top welding) | DCPulse frequency from 150Hz and abovePulse frequency from 10 to 50%Start current above peak current by 5-10A, base current by 25-50% of peak current.Peak current up to 75-95A. ACAnalogous to DC and optional:AC frequency from 150Hz and above.AC polarity balance above half. | DCStarting current above peak current by 10-25A.Peak current from 70-85A. ACAnalogous to DC and additionally:AC frequency below 100Hz.AC polarity balance below half. |
| Horizontal (right-to-left welding) | DCPulse frequency from 100Hz and above.Pulse frequency from 30 to 50%.Starting current above peak current by 5-10A, base current by 25-50% of peak current.Peak current up to 70-85A. ACAanalogous to DC and additionally:AC frequency from 100Hz and above.AC polarity balance above half. | DCStarting current above peak current by 10-25A.Peak current from 70-85A. ACAnalogous to DC and optional:AC frequency below 100Hz.AC polarity balance below half. |
| Ceiling | DCPulse frequency from 150Hz and above.Pulse RMS from 10 to 50%.Start current above peak current by 5-10A, base current by 25-50% of peak current.Peak current up to 65-85A. ACanalogous to DC and additionally:AC frequency from 150Hz and above.AC polarity balance above half. | DCPulse frequency from 100Hz and abovePulse frequency from 10 to 50%Starting current above peak current by 5-10A, base current by 25-50% of peak current.Peak current from 65-85A. ACAnalogous to DC and optional:AC frequency below 100Hz.AC polarity balance below half. |
Conclusion
Rolling up the article, we hope that these improvements tips will make your tig welding more accurate and fast. The stainless steel tig welding is interesting and nice only if you follow the right steps.
The major reason for most welder failure in stainless steel welding is that they try to do their work by shortcuts. You can follow a shortcut in another metal welding, but in stainless steel welding, there is no shortcut to follow.
If you find this article helpful and beneficial, so give us your feedback in the comment section. Also, don’t forget to share it with your coworkers and other welder friends.

")
")


")